The Belle Woven Dress sewing pattern creates a button-through dress with a V-neck, back waist shirring, 3/4 sleeves with optional shirring and elastic, a double front yoke, gathered details, and optional inseam pockets.
Button through dress with sleeves
Back waist shirring for ease over bust and waist
"V" neck shape
3/4 sleeve with a mid shirring feature and elastic opening
Double front waist yoke
Gathered bodice, skirt and sleeve head
Inseam pockets (optional)
Edge top stitching on front bodice yokes and front turn backs
Fabric Suggestion
Silk, crepe and rayon
Reviews (11)
11 reviews for Belle Woven Dress
5 out of 5
Format Reviewed: PDF Digital Pattern - Single-Size
l**a(verified owner) – :
I love this dress. I made one in a morning, so a second one a couple of days later. The fit is perfect, excellent sizing, very flattering (bust 42, waist 37 and I got size 18). I didn’t LOVE the construction, as it was t so intuitive for me, but I understand they did it for ease. It is very easy to make if you’ve done dresses before. The instructions were a little confusing when it came to the waist, but I did my own thing and loved the outcome. I’ll be making more of this dress and of these patterns!
4 out of 5
Format Reviewed: PDF Digital Pattern - Multi-Size
D***y(verified owner) – :
I’ve made 2 Belle dresses in quick succession. 1 as a toile and the second for my daughters wedding as mother of the bride.
Both were relatively easy to make but I did need to use you tube as the instructions were not clear. They have some beautiful details to make the dress fit and feel comfortable to wear. Compliments have been plentiful. I do plan more.
5 out of 5
Format Reviewed: PDF Digital Pattern - Multi-Size
t*****e(verified owner) – :
Love this dress. I cut a size 6 and it fit without alterations. It was very quick to sew and I will make more!
3 out of 5
Format Reviewed: PDF Digital Pattern - Multi-Size
A****a(verified owner) – :
The cut of the dress is fantastic and allows well for a larger bust, however, the instructions are poor. As an intermediate sewist, for such a complicated dress, two pages of instructions is insufficient and pictures would help so much with construction. It would also be nice to know how much to gather/shirr the fabric, even a mention of “gather this so that it is the same width as x”. Overall, I love my dress and will use the pattern again but disappointed with the rest.
4 out of 5
Format Reviewed: PDF Digital Pattern - Multi-Size
J****a(verified owner) – :
I have made 2 of these dresses and struggle with the same parts every time. On my third dress I realised that changing the order of the steps created a much better result.
Love this pattern, though and the dresses are so comfy to wear.
3 out of 5
Format Reviewed: PDF Digital Pattern - Multi-Size
L**a(verified owner) – :
Dress is stunning. Pattern is exceptionally hard to read. Be prepared to read between the lines at every step.
5 out of 5
Format Reviewed: Printed Pattern - Single-Size
w************4(verified owner) – :
Loved the look of this dress and the pattern worked really well. Have made it in a muted yellow and white spot pattern and it looks good with a light blue denim jacket.
5 out of 5
Format Reviewed: Printed Pattern - Single-Size
d***********h(verified owner) – :
I’m really happy with this lovely dress. I made it in a rayon print and used mother of pearl buttons. The V neck sits really well and does not gape, although the V looks low in the line drawings the overlap keeps everything covered. I joined the back bodice and skirt to the midriff piece before shirring and that was much easier. Thanks Style Arc, I love it
5 out of 5
Format Reviewed: PDF Digital Pattern - Single-Size
m**************3(verified owner) – :
Fantastic dress patter! Really caught my eye with some wonderful detailing of shirring and buttons!
Cannot wait to wear this dress out!
Just finished a Belle in a Rayon. Came together well. The methods shown gave a very professional finish and I was very happy with the finished article. What I did have difficulties with was the shirring – my machine was not easy to adjust -is there a standard amount of gathering? 1eg: 12 inch fabric equals 6 gathered.
5 out of 5
Format Reviewed: PDF Digital Pattern - Multi-Size
J*****a(verified owner) – :
I just finished my second Belle and want to make a third:). It’s both fun to sew and gorgeous to wear. Made zero alterations to the fit, which rarely happens. Worth every penny.
Only logged in customers who have purchased this product may leave a review.
Garment Measurements & Fabric Estimate
Finished Pattern Measurements (cm)
sizes
4
6
8
10
12
14
16
18
20
22
24
26
28
30
Bust includes fullness
101.0
106.0
111.0
116.0
121.0
126.0
131.0
136.0
142.0
148.0
154.0
160.0
166.0
172.0
Shirred waist
65.0
70.0
75.0
80.0
85.0
90.0
95.0
100.0
106.0
112.0
118.0
124.0
130.0
136.0
Hip
135.0
140.0
145.0
150.0
155.0
160.0
165.0
170.0
176.0
182.0
188.0
194.0
200.0
206.0
Shoulder breadth
34.4
35.6
36.8
38.0
39.2
40.4
41.6
42.8
43.4
44.0
44.6
45.2
45.8
46.4
Sleeve length
48.2
48.8
49.4
50.0
50.6
51.2
51.8
52.4
53.0
53.6
54.2
54.8
55.4
56.0
Hem circumference
193.0
198.0
203.0
208.0
213.0
218.0
223.0
228.0
234.0
240.0
246.0
252.0
258.0
264.0
Elastic measurement for each sleeve, add 2cm (3⁄4") for seams
19.0
20.0
21.0
22.0
23.0
24.0
25.0
26.0
27.0
28.0
29.0
30.0
31.0
32.0
Finished Pattern Measurements (inches)
sizes
4
6
8
10
12
14
16
18
20
22
24
26
28
30
Bust includes fullness
39 3⁄4
41 3⁄4
43 3⁄4
45 5⁄8
47 5⁄8
49 5⁄8
51 5⁄8
53 1⁄2
55 7⁄8
58 1⁄4
60 5⁄8
63
65 3⁄8
67 3⁄4
Shirred waist
25 5⁄8
27 1⁄2
29 1⁄2
31 1⁄2
33 1⁄2
35 3⁄8
37 3⁄8
39 3⁄8
41 3⁄4
44 1⁄8
46 1⁄2
48 7⁄8
51 1⁄8
53 1⁄2
Hip
53 1⁄8
55 1⁄8
57 1⁄8
59
61
63
65
66 7⁄8
69 1⁄4
71 5⁄8
74
76 3⁄8
78 3⁄4
81 1⁄8
Shoulder breadth
13 1⁄2
14
14 1⁄2
15
15 3⁄8
15 7⁄8
16 3⁄8
16 7⁄8
17 1⁄8
17 3⁄8
17 1⁄2
17 3⁄4
18
18 1⁄4
Sleeve length
19
19 1⁄4
19 1⁄2
19 5⁄8
19 7⁄8
20 1⁄8
20 3⁄8
20 5⁄8
20 7⁄8
21 1⁄8
21 3⁄8
21 5⁄8
21 3⁄4
22
Hem circumference
76
78
79 7⁄8
81 7⁄8
83 7⁄8
85 7⁄8
87 3⁄4
89 3⁄4
92 1⁄8
94 1⁄2
96 7⁄8
99 1⁄4
101 5⁄8
103 7⁄8
Elastic measurement for each sleeve, add 2cm (3⁄4") for seams
7 1⁄2
7 7⁄8
8 1⁄4
8 5⁄8
9
9 1⁄2
9 7⁄8
10 1⁄4
10 5⁄8
11
11 3⁄8
11 3⁄4
12 1⁄4
12 5⁄8
Fabric Estimate - cut on the open
sizes
4-22
24-30
Width 148 cm (58")
3.30 m (3.50 yd)
3.75 m (4.10 yd)
Fuse Estimate
sizes
4-30
Width 90 cm (36")
90 cm (1.00 yds)
Size Chart
Womens Size Charts
Please use the body measurements size charts below to determine your best size.
All Style Arc patterns are in Australian sizes.
Style Arc patterns are drafted for a B bust cup size and a height of 167cm (5'6").
Size Chart - CM
Size
A. Shoulder Breadth (cm)
B. Upper Arm Girth (cm)
C. Bust (cm)
D. Waist (cm)
E. Hip (cm)
4
34.4
26.4
77
60
83
6
35.6
27.6
82
65
88
8
36.8
28.8
87
70
93
10
38
30
92
75
98
12
39.2
31.2
97
80
103
14
40.4
32.4
102
85
108
16
41.6
33.6
107
90
113
18
42.8
34.8
112
95
118
20
44
36
118
100
124
22
45.2
37.2
124
106
130
24
46.4
38.4
130
112
136
26
47.6
39.6
136
118
142
28
48.8
40.8
142
124
148
30
50
42
148
130
154
32
51.2
43.8
156.0
139.0
162.0
34
52.4
45.6
164.0
147.0
170.0
36
53.6
47.4
172.0
155.0
178.0
Size Chart - Inches
Size
A. Shoulder Breadth (inches)
B. Upper Arm Girth (inches)
C. Bust (inches)
D. Waist (inches)
E. Hip (inches)
4
13.5
10.5
30.3
23.5
32.6
6
14
10.9
32.3
25.5
34.6
8
14.5
11.3
34.3
27.5
36.6
10
15
11.8
36.2
29.5
38.6
12
15.4
12.3
38.2
31.5
40.6
14
15.9
12.8
40.2
33.5
42.5
16
16.4
13.2
42.1
35.5
44.5
18
16.9
13.7
44.1
37.5
46.5
20
17.3
14.2
46.5
39.5
48.8
22
17.8
14.6
48.8
42
51.2
24
18.3
15.1
51.2
44.5
53.5
26
18 3⁄4
15 5⁄8
53 1⁄2
46.5
56
28
19 1⁄4
16 1⁄8
56
48.5
58 1⁄4
30
19 3⁄4
16 5⁄8
58 1⁄4
50.5
61
32
20 1⁄8
17 1⁄4
61 3⁄8
54 3⁄4
63 3⁄4
34
20 5⁄8
18
64 5⁄8
57 7⁄8
66 7⁄8
36
21 1⁄8
18 5⁄8
67 3⁄4
61
70 1⁄8
Size Conversion Table
ALPHA SIZING
AUSTRALIA
UK
US
FRANCE
ITALY
JAPAN
XXS
6
6
2
34
38
5
XS
8
8
4
36
40
7
S
10
10
6
38
42
9
M
12
12
8
40
44
11
L
14
14
10
42
46
13
XL
16
16
12
44
48
15
XXL
18
18
14
46
50
17
3XL
20
20
16
48
52
19
4XL
22
22
18
50
54
21
5XL
24
24
20
52
56
23
How Do I Know What Size I Am?
Choosing your pattern size is the most important step and we will help you determine this with these easy to follow steps.
When taking your measurements ensure that you take them against your skin and not over clothing. One can wear a comfortable bra and knickers whilst measuring, as this will provide you with the most accurate measurements.
Tape measure has to sit firmly around the points you are measuring. But be careful not to pull it too tight, as this will give you the incorrect size.
When measuring circumferences (B, C, D, E) it is important to note that the tape measure must remain parallel to the floor. It is sometimes best to take the measurements in front of a mirror; this will help you see the angle of the tape measure.
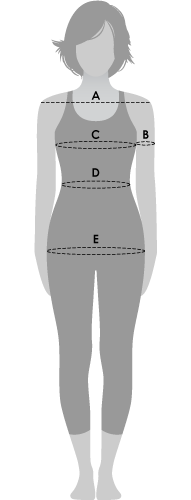
You will only require the basic body measurements to determine your pattern size which is indicated on our mannequin below:
A. Shoulder Breadth
Place the tape at the edge of the shoulder. Measure along the top of the shoulder blade/across the highest point of the shoulders to the other edge, following the natural slope and allow an extra finger for ease of any movement.
B. Upper Arm Girth
This point is taken as a circumference at your widest point of your upper arm.
C. Bust
This point is taken as a circumference parallel to the floor at the fullest part of your chest.
D. Waist
This point is taken as a circumference and taken at the smallest part of your waist.
E. Hip
This point is taken as a circumference parallel to the floor at the widest part of your hips.
PDF Details
PDF File Inclusions With Purchase
PDF Pattern Size
PDF Files Included with Purchase
PDF Page Count
Size 4
Size 4 Size 6 Size 8 A0 Size 4 A0 Size 6 A0 Size 8 Wide Format Size 4 Wide Format Size 6 Wide Format Size 8 Construction Sheet
57 57 57 3 3 3 2 2 2 5
Size 6
Size 6 Size 4 Size 8 A0 Size 6 A0 Size 4 A0 Size 8 Wide Format Size 6 Wide Format Size 4 Wide Format Size 8 Construction Sheet
57 57 57 3 3 3 2 2 2 5
Size 8
Size 8 Size 6 Size 10 A0 Size 8 A0 Size 6 A0 Size 10 Wide Format Size 8 Wide Format Size 6 Wide Format Size 10 Construction Sheet
57 57 57 3 3 3 2 2 2 5
Size 10
Size 10 Size 8 Size 12 A0 Size 10 A0 Size 8 A0 Size 12 Wide Format Size 10 Wide Format Size 8 Wide Format Size 12 Construction Sheet
57 57 57 3 3 3 2 2 2 5
Size 12
Size 12 Size 10 Size 14 A0 Size 12 A0 Size 10 A0 Size 14 Wide Format Size 12 Wide Format Size 10 Wide Format Size 14 Construction Sheet
57 57 57 3 3 3 2 2 2 5
Size 14
Size 14 Size 12 Size 16 A0 Size 14 A0 Size 12 A0 Size 16 Wide Format Size 14 Wide Format Size 12 Wide Format Size 16 Construction Sheet
57 57 57 3 3 3 2 2 2 5
Size 16
Size 16 Size 14 Size 18 A0 Size 16 A0 Size 14 A0 Size 18 Wide Format Size 16 Wide Format Size 14 Wide Format Size 18 Construction Sheet
57 57 66 3 3 3 2 2 2 5
Size 18
Size 18 Size 16 Size 20 A0 Size 18 A0 Size 16 A0 Size 20 Wide Format Size 18 Wide Format Size 16 Wide Format Size 20 Construction Sheet
66 57 66 3 3 3 2 2 2 5
Size 20
Size 20 Size 18 Size 22 A0 Size 20 A0 Size 18 A0 Size 22 Wide Format Size 20 Wide Format Size 18 Wide Format Size 22 Construction Sheet
66 66 66 3 3 3 2 2 2 5
Size 22
Size 22 Size 20 Size 24 A0 Size 22 A0 Size 20 A0 Size 24 Wide Format Size 22 Wide Format Size 20 Wide Format Size 24 Construction Sheet
66 66 66 3 3 3 2 2 2 5
Size 24
Size 24 Size 22 Size 26 A0 Size 24 A0 Size 22 A0 Size 26 Wide Format Size 24 Wide Format Size 22 Wide Format Size 26 Construction Sheet
66 66 66 3 3 3 2 2 2 5
Size 26
Size 26 Size 24 Size 28 A0 Size 26 A0 Size 24 A0 Size 28 Wide Format Size 26 Wide Format Size 24 Wide Format Size 28 Construction Sheet
66 66 66 3 3 3 2 2 2 5
Size 28
Size 28 Size 26 Size 30 A0 Size 28 A0 Size 26 A0 Size 30 Wide Format Size 28 Wide Format Size 26 Wide Format Size 30 Construction Sheet
66 66 66 3 3 3 2 2 2 5
Size 30
Size 30 Size 28 Size 26 A0 Size 30 A0 Size 28 A0 Size 26 Wide Format Size 30 Wide Format Size 28 Wide Format Size 26 Construction Sheet
66 66 66 3 3 3 2 2 2 5
Pattern Format Details
Pattern Format
PDF Digital Pattern - Single-Size (Including A0)
Single-size PDF sewing pattern download, sent to your email address in multi-sheet/tiled format for printing at home on A4 or US letter size paper AND A0 format for printing at a copy shop. You get the size you order, PLUS the two closest sizes.
Multi-size PDF sewing pattern download, sent to your email address in multi-sheet/tiled format for printing at home on A4 or US letter size paper and single-sheet/wide format for printing at a copy shop. Please note that the wide format files are set up for printing on 36" wide (or wider) paper rolls, and also A0 paper sheets. A projector file is also included.


Format Reviewed: PDF Digital Pattern - Single-Size
l**a (verified owner) – :
I love this dress. I made one in a morning, so a second one a couple of days later. The fit is perfect, excellent sizing, very flattering (bust 42, waist 37 and I got size 18). I didn’t LOVE the construction, as it was t so intuitive for me, but I understand they did it for ease. It is very easy to make if you’ve done dresses before. The instructions were a little confusing when it came to the waist, but I did my own thing and loved the outcome. I’ll be making more of this dress and of these patterns!
Format Reviewed: PDF Digital Pattern - Multi-Size
D***y (verified owner) – :
I’ve made 2 Belle dresses in quick succession. 1 as a toile and the second for my daughters wedding as mother of the bride.
Both were relatively easy to make but I did need to use you tube as the instructions were not clear. They have some beautiful details to make the dress fit and feel comfortable to wear. Compliments have been plentiful. I do plan more.
Format Reviewed: PDF Digital Pattern - Multi-Size
t*****e (verified owner) – :
Love this dress. I cut a size 6 and it fit without alterations. It was very quick to sew and I will make more!
Format Reviewed: PDF Digital Pattern - Multi-Size
A****a (verified owner) – :
The cut of the dress is fantastic and allows well for a larger bust, however, the instructions are poor. As an intermediate sewist, for such a complicated dress, two pages of instructions is insufficient and pictures would help so much with construction. It would also be nice to know how much to gather/shirr the fabric, even a mention of “gather this so that it is the same width as x”. Overall, I love my dress and will use the pattern again but disappointed with the rest.
Format Reviewed: PDF Digital Pattern - Multi-Size
J****a (verified owner) – :
I have made 2 of these dresses and struggle with the same parts every time. On my third dress I realised that changing the order of the steps created a much better result.
Love this pattern, though and the dresses are so comfy to wear.
Format Reviewed: PDF Digital Pattern - Multi-Size
L**a (verified owner) – :
Dress is stunning. Pattern is exceptionally hard to read. Be prepared to read between the lines at every step.
Format Reviewed: Printed Pattern - Single-Size
w************4 (verified owner) – :
Loved the look of this dress and the pattern worked really well. Have made it in a muted yellow and white spot pattern and it looks good with a light blue denim jacket.
Format Reviewed: Printed Pattern - Single-Size
d***********h (verified owner) – :
I’m really happy with this lovely dress. I made it in a rayon print and used mother of pearl buttons. The V neck sits really well and does not gape, although the V looks low in the line drawings the overlap keeps everything covered. I joined the back bodice and skirt to the midriff piece before shirring and that was much easier. Thanks Style Arc, I love it
Format Reviewed: PDF Digital Pattern - Single-Size
m**************3 (verified owner) – :
Fantastic dress patter! Really caught my eye with some wonderful detailing of shirring and buttons!
Cannot wait to wear this dress out!
Format Reviewed: PDF Digital Pattern - Multi-Size
S*e (verified owner) – :
Just finished a Belle in a Rayon. Came together well. The methods shown gave a very professional finish and I was very happy with the finished article. What I did have difficulties with was the shirring – my machine was not easy to adjust -is there a standard amount of gathering? 1eg: 12 inch fabric equals 6 gathered.
Format Reviewed: PDF Digital Pattern - Multi-Size
J*****a (verified owner) – :
I just finished my second Belle and want to make a third:). It’s both fun to sew and gorgeous to wear. Made zero alterations to the fit, which rarely happens. Worth every penny.