 This clever pattern creates beautiful draping at the front while leaving the back as a regular shirt. Wear it with a cami or use a press stud to close the cross over at the front. You will love this top! Fabric Suggestions: Silk, crepe, viscose or you could use a jersey knit. Because of the way the pattern is drafted please be sure to purchase a fabric with two “good” sides. Helpful Hints:
- Cut out the pattern, taking note of the grain lines and the notes written on the pattern pieces as this will assist you in the construction of the top.
- Lay the pattern on the open fabric, pin, mark & cut. Mark or clip all notches that are marked on the pattern.
- The front body turns back on itself, so take care to select a fabric which has no right or wrong side.
- The neck tuck on the right side is stitched to the inside. Take care that the neck tuck on the left side is stitched so it faces the opposite side.
- Seam allowance is 1cm (3/8″) & 6mm (1/4″) for internal seams, e.g. neck top edge.
Construction:
- Sew the right front tuck so it faces inward. Sew the left front tuck so it faces the opposite side.
- Fold and press the right front neck facing to the inside. Fold and press the left front neck facing to the opposite side. Fold the front body in half where noted on the pattern. (The fold created at the bottom forms the front hem.) Do not press this fold.
- Baste along the lower side seam to hold the facings in place. See sketch & notes on pattern.
- Gather the top of the back body at the centre back between the notches.
- Pin the back upper edge to the lower edge one of the shoulder yokes, right sides together, making sure the gathers are centred and evenly distributed between the notches of the yoke. Take the other yoke and pin it to the body so the right side of the yoke faces the wrong side of the body. (The back will be sandwiched between the right sides of the two yokes). Stitch all layers together. See the “Double Yoke Tutorial” on the Style Arc website for more details.
- Roll the entire back piece and pin to keep it out of the way. Pin the two yokes, right sides together, at the neckline edge. Sew the yokes together along the neck edge, making sure not to catch the back piece in the stitching. Remove the pin holding the rolled-up back. Turn the yokes to the right side and press.
- Baste the inner and outer yoke pieces together at the shoulder seamline to keep the two layers together. 8. Make sure the front is folded in the correct direction (right over left). Unfold the front neck facing at the shoulder. Pin the shoulder seam of the yoke to the shoulder seam of the front body, matching at the notches. (The finished neckline edge of the yoke should be directly against the foldline of the front neckline facing.) Sew the shoulder seam, making sure not to catch the front facing.
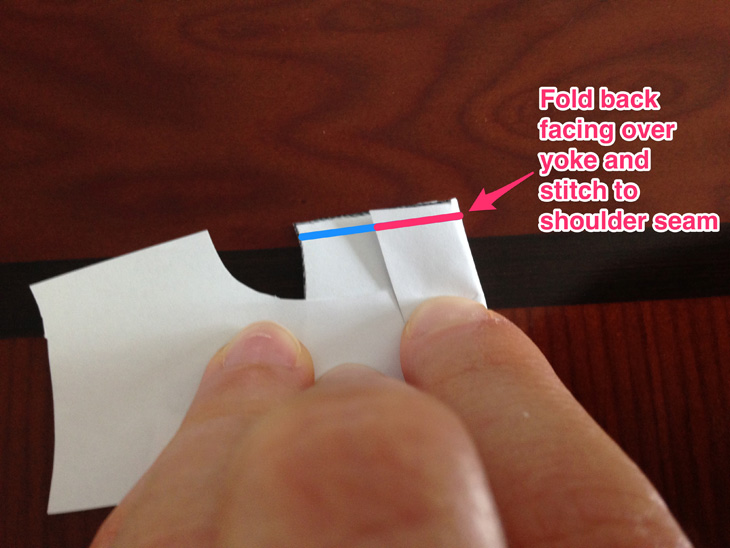
- Fold the front neckline facing over the shoulder seam you just sewed, with the right side of the facing against the inner yoke. At this point the neckline edge of the yoke will be completely wrapped by the facing. Stitch the front facing in place. (You will be stitching over the previous seam.) Turn to the outside. If desired you can topstitch the facings in place, using the inside edge of the facing as a guide.
- Run a large stitch around the head of the sleeve to help ease it into the armhole.
- Set the sleeve into the armhole, following the notches.
- Pin the side seams of the front and back body together. Pin the edges of the sleeve seam together. Starting from the hem, sew the side seam to the armhole and continue down the underarm seam of the sleeve, sewing all the way down to the sleeve opening.
- Fold the cuff in half crosswise. Sew the short ends of the cuff together, turn to the right side, and press the cuff in half lengthwise.
- Gather the sleeve opening to fit the cuff. Sew the cuff to the sleeve, right sides together.
- Sew the back hem in place.
- Before sewing a stud to the centre front cross over we suggest you try on your top and?mark where it best suits your body. If you plan on wearing a camisole under your top a stud isn’t necessary.
- When pressing the top do not press the front hem at the foldline. Leaving this section unpressed gives the hemline a soft, rolled effect.