 Fabric Suggestions: Light weight suiting, linen Helpful Hints:
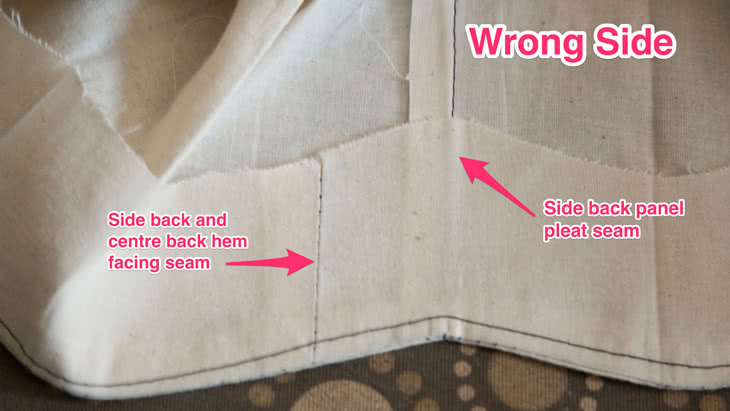
- The back hem facing/ side hem facing seam is located about 2.7cm (1″) beyond the side back pleat seam. This is to minimize bulk at the pleat fold. Make sure to mark the notches at the hemline carefully on both the body panels and facing.
Construction:
- Sew the centre back panel and back neck facing neck darts. Set the back neck facing aside.
- Sew the centre back seam of the centre back panels together.
- Sew the centre back under pleat piece to the centre back panels, matching at the notches.
- Sew the side back panels to the centre back panels.
- Sew the centre back under pleat seam to the side back pleat seam, following the notches.
- Fold the pleats as marked on the pattern to achieve a total of three inverted pleats: one at the centre back and one on each side. Once in place press and baste along the top edge of the pleat to hold in place. Mark a diagonal topstitching line on the pleats and topstitch. This topstitching will hold the pleats in place. See the diagram.
- With right sides together, sew the front yoke to the centre front panel, matching at the notches.
- Sew the side front panel to the centre front panel.
- Stitch the front and back together at the shoulder and side seams.
- For the sleeveless version: Join the back and front armhole facings together at the shoulder and underarm seams. With right sides together place the facings on top of the armholes and match the notches. Stitch in place. Turn the facings out and press the seam allowance toward the facing. Understitch along the armhole seam by sewing the armhole seam allowance to the armhole facing about 3mm (1/8″) away from the armhole seamline. Turn the facing to the inside of the top. Secure the facings in place by stitching the facing to the shoulder and side seams.
- For the short sleeve style: Sew the underarm seam of the sleeve. Run a large stitch around the sleeve head. Set the sleeve into the armhole, matching at the notches and slightly pulling the thread ends to help ease the sleeve into the armhole. Hem the bottom of the sleeve.
- Sew the front neck yoke facing to the front facing.
- Join the back neck facing to the front neck yoke facing at the shoulder seam.
- Join the hemline of the front facing to the side back hem facing.
- Join the side back hem facing to the back hem facing. At this point all the facings are sewn together and ready to attach to the body.
- Baste the open ended zipper onto the centre front panel, centering it between the lower zip notch and the top of the neckline.
- With right sides together, pin the facing to the body along the outside edges. The zipper will be sandwiched between the front facing and the centre front body panel. Note: the seam where the side back hem facing is joined to the back hem facing is positioned about 2.7cm (1″) beyond the side back pleat and centre back panel pleat seam to minimize bulk at the pleat fold (see photo).
- Stitch the facing to the body. Turn the facing out. Understitch the outer edge seam allowances to the facings.
- Press the facing in place. Pin the facing to the body at any seam intersections. Carefully stitch the facing to the body along these seamlines to keep the facing from rolling to the outside.
- Stitch the hemline in place. You can use a wide decorative topstitch or a blind hem €“ the choice is yours.
- Press your new top.