
Style Arc PDF Patterns
Print and assemble your pattern at home
Follow these steps to download your Style Arc tiled PDF, print it at the correct scale, select the sizes you need where layers are available, and assemble the pages accurately.
Allow approximately 20–40 minutes, depending on the number of pages.
First, choose your route
Which Style Arc file are you using?
Style Arc PDF orders can include different file formats. Choose the one that matches how you want to work.
Tiled PDF
Print at home or in the office on A4 or US Letter paper, then join the pages together.
A0 / Wide Format
Send the large-format file to a copy shop or specialist pattern printer instead of assembling tiled pages.
Projector PDF
Where included with your pattern, use the projector file to project full-size pattern pieces directly onto fabric.
The complete process
Seven steps from download to ready-to-cut pattern
Before you begin
What you will need
You do not need specialist equipment—just a reliable way to control print scale.
Choose and save the Tiled PDF
Download the pattern file to your device before printing. For home printing, open the file labelled Tiled rather than A0, Wide Format or Projector.
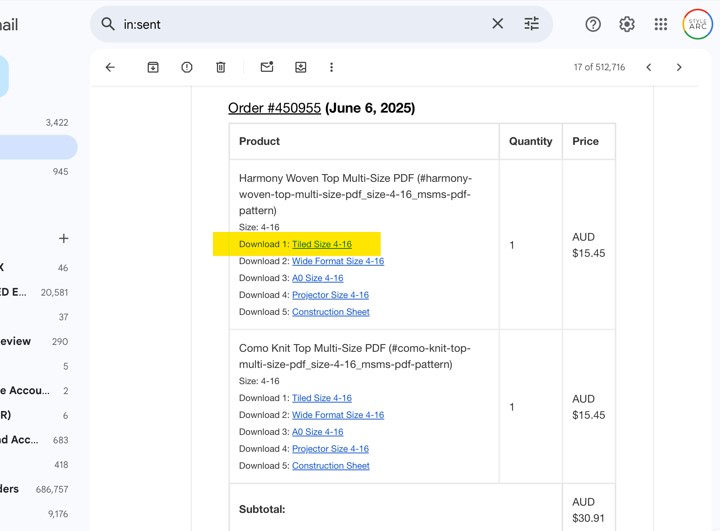
Use Adobe Acrobat Reader
For the most reliable print-scale controls and access to selectable PDF layers, open the downloaded pattern in the free desktop version of Adobe Acrobat Reader.
If Adobe Reader is already installed, make sure it is up to date before troubleshooting a printing problem.
Choose the size layers you need
Many newer Style Arc multi-size PDF patterns include selectable layers. Hiding sizes you do not need can make the cutting lines easier to read. Older files may not have selectable layers.
Print and measure the test square
Print only the page containing the test square first. Do not commit to the full pattern until the measurement is correct.
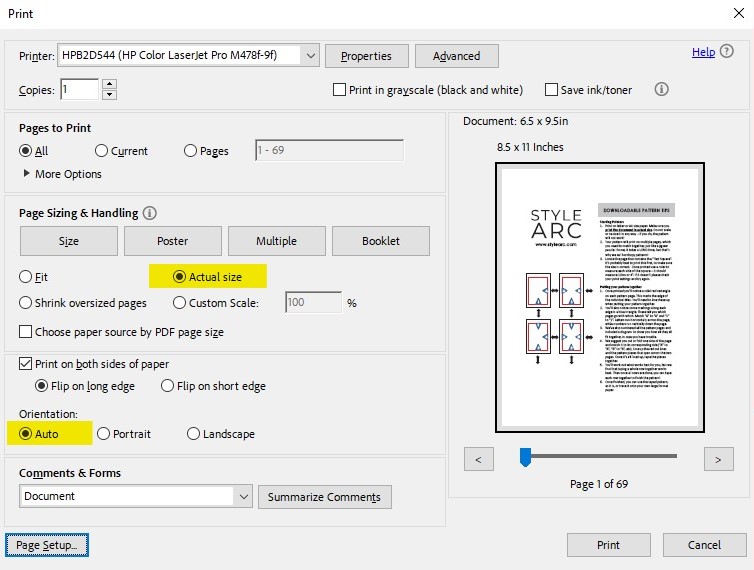
Print the remaining pattern pages
Once the test square is correct, keep the same scale settings and print the tiled pattern pages you need.
Align and join the tiled pages
Use the layout sheet and the joining marks printed on the pattern to place each page in the correct position.
1. Check the layout
Arrange the printed sheets in the same order shown on the pattern layout diagram.
2. Trim consistently
Trim consistently
Remove the top and left border from each applicable page, leaving the opposite edges for overlap.
3. Match the markers
Align corresponding page markers and make sure pattern lines continue smoothly across the join.
4. Join the pages
Tape or glue lightly first. Reinforce the joins once the alignment is correct.
Your pattern is ready to use
Before cutting, compare the assembled pattern with the layout diagram and check the joins.
You can now cut your selected size from the assembled pattern, or trace it onto pattern paper if you prefer.
Printing troubleshooting
Something not looking right?
Choose the problem that most closely matches what you can see. Always retest one page before printing the full pattern again.
+My test square is too large or too small
A common cause of an incorrect test-square measurement is printing from the web link or browser preview instead of first downloading the pattern as a PDF. This is especially easy to do when printing from an iPad, because the print process is different from printing on a laptop or PC through Adobe Acrobat Reader.
If you are printing from a computer, open the fully downloaded Tiled PDF in Adobe Acrobat Reader and confirm Actual Size or 100% scale. If you are printing from an iPad, follow the full iPad sequence below before printing.
Do not print the full pattern until the test square measures 10 cm × 10 cm.
+My pages are off-centre or the tile edges are being cut off
These are the basic printer-dialogue checks used on the current Style Arc tutorial when a pattern is printing off-centre or cutting the edge of tiled pages.
+Large black squares or diamonds are printing
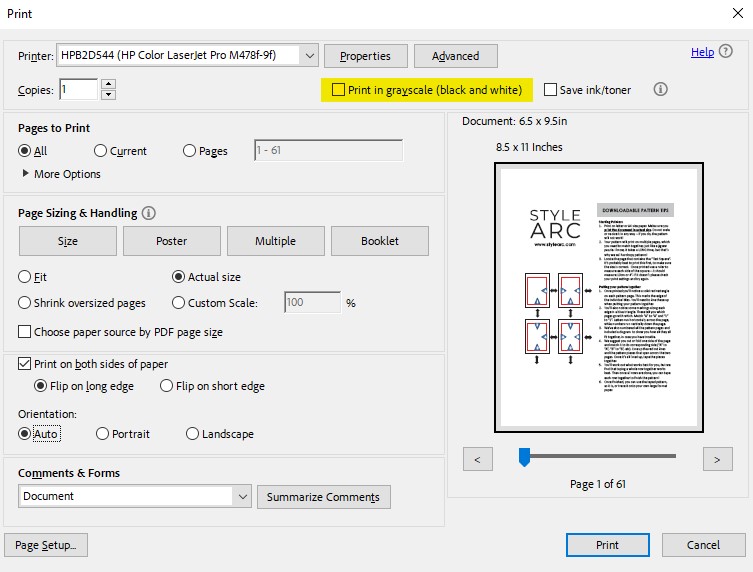
A small number of customers have reported large black squares or diamonds appearing on tiled pattern pieces after printing. The current Style Arc tutorial notes that the glitch seems to affect Mac users more often, although the exact cause is not known.
The most common fix is simple: deselect Grayscale in the printer settings, then print one test page again.
+I cannot see the size layers
+I am printing from an iPad or iPhone
The current Style Arc tutorial gives a four-step iPad process. The key point is that the file opened from the order link is initially a web-link document, not yet the downloaded PDF. Printing at that stage is a common reason the test square is the wrong size.
Before starting, make sure a printer is already connected to the iPad, and read all four steps before printing.
Open the Tiled file from your Style Arc order
Open your email order and tap the Tiled file you want to print at home.
The document opens in a new window. At this point it is still a web-link document rather than the actual downloaded PDF.
Do not print from this screen. You must finish saving the file as a PDF first.
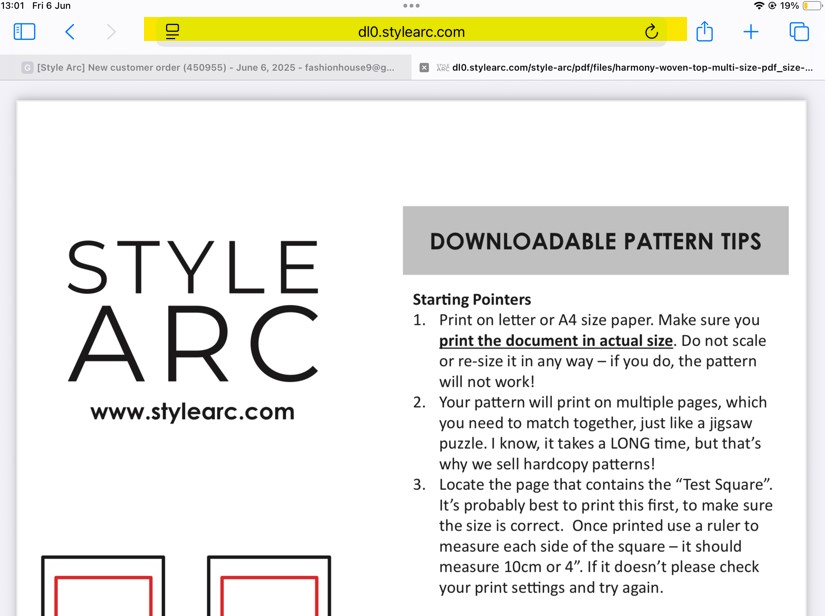
Save the pattern to Files
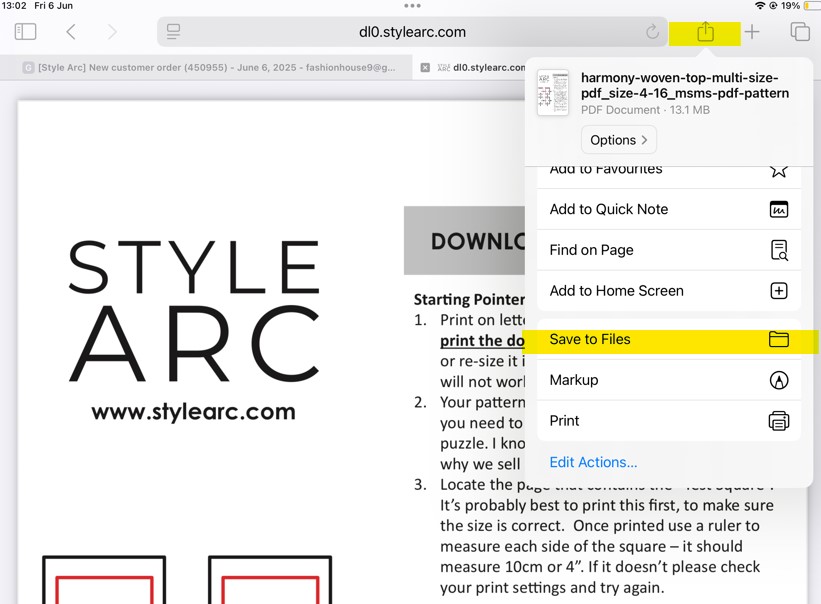
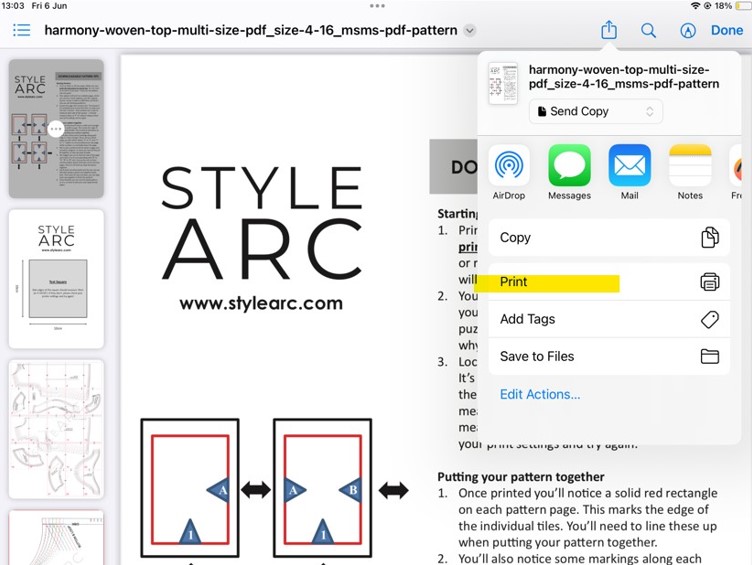
Tap the Share / Send To icon at the top right of the screen. In the menu that opens, scroll until you see Save to Files, then select it.
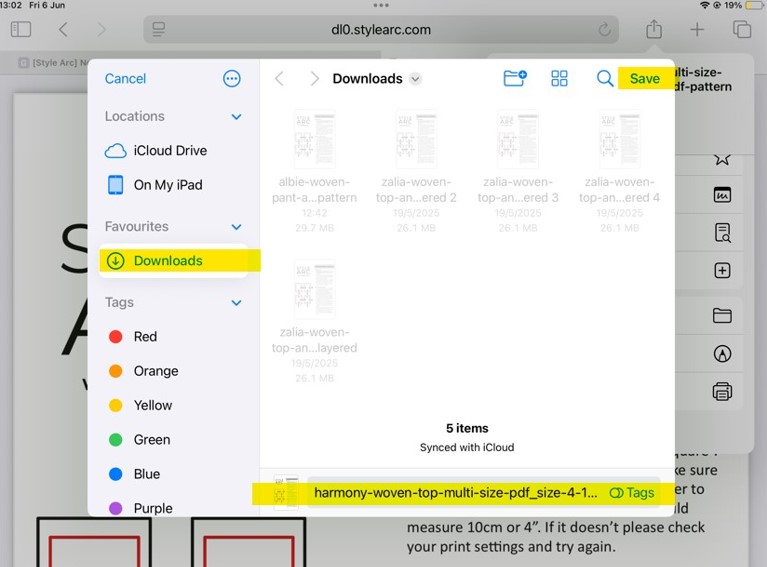
The iPad will show the download location and the file name. You can rename the file, but Style Arc recommends leaving the name as it is. Tap Save in the top-right corner.
When the save is complete, exit that screen and return to the iPad home screen.
Open the downloaded PDF from the Files app
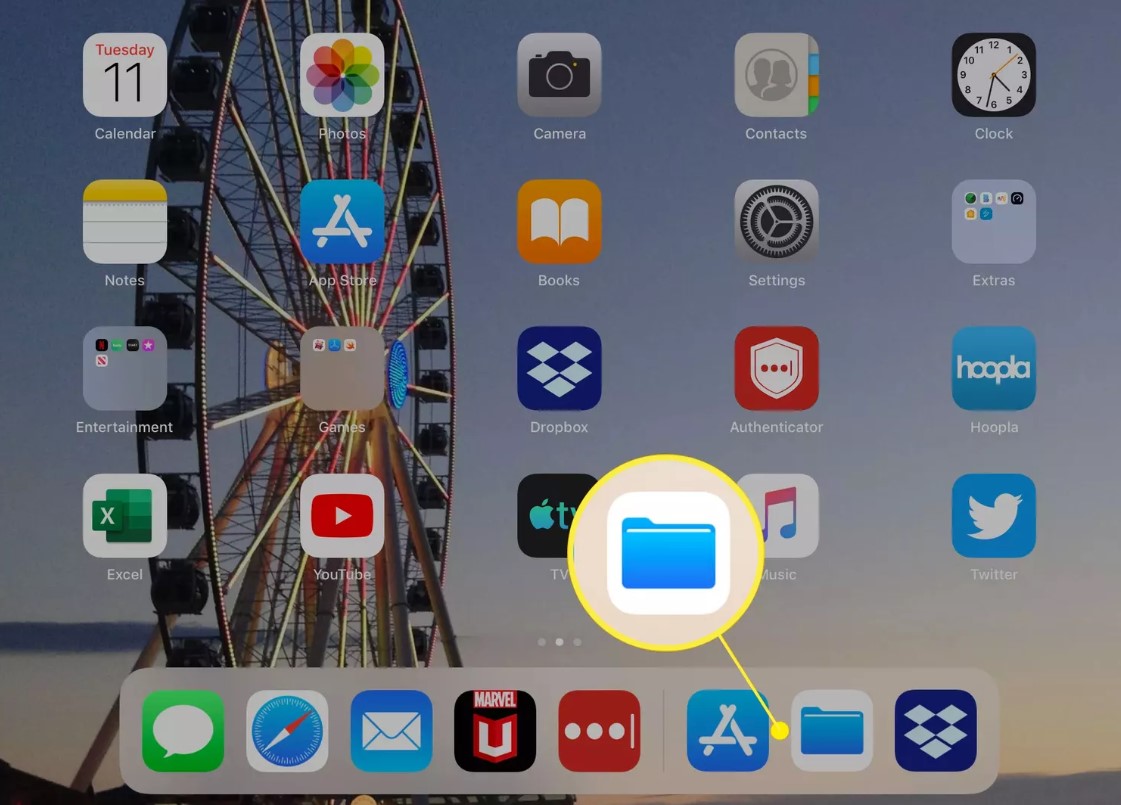
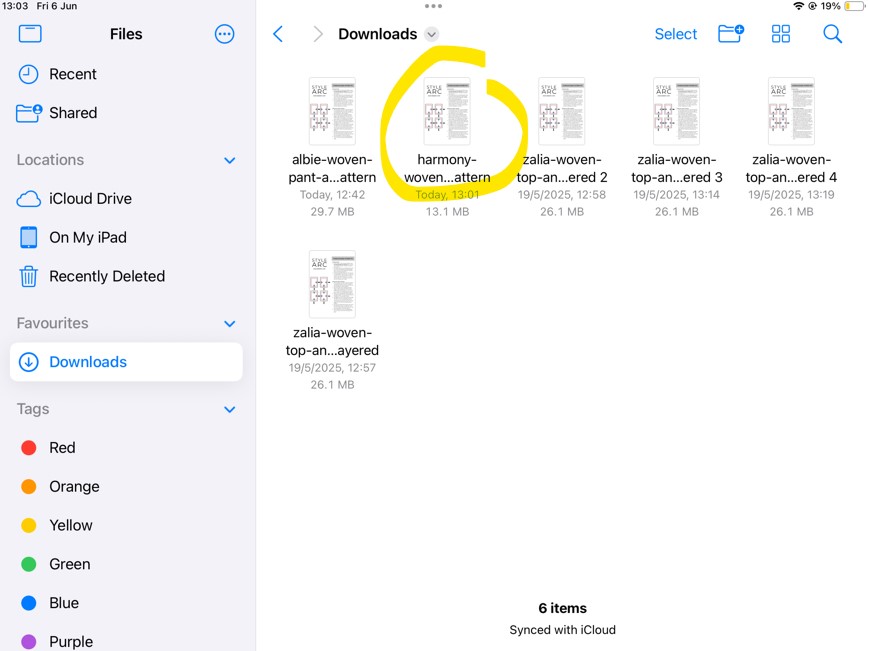
On the iPad home screen, find the Files app and open it. This takes you back to the folder where you saved the pattern.
Select the pattern you want to print and open it.
The pattern should now open as a downloaded PDF ready for printing.
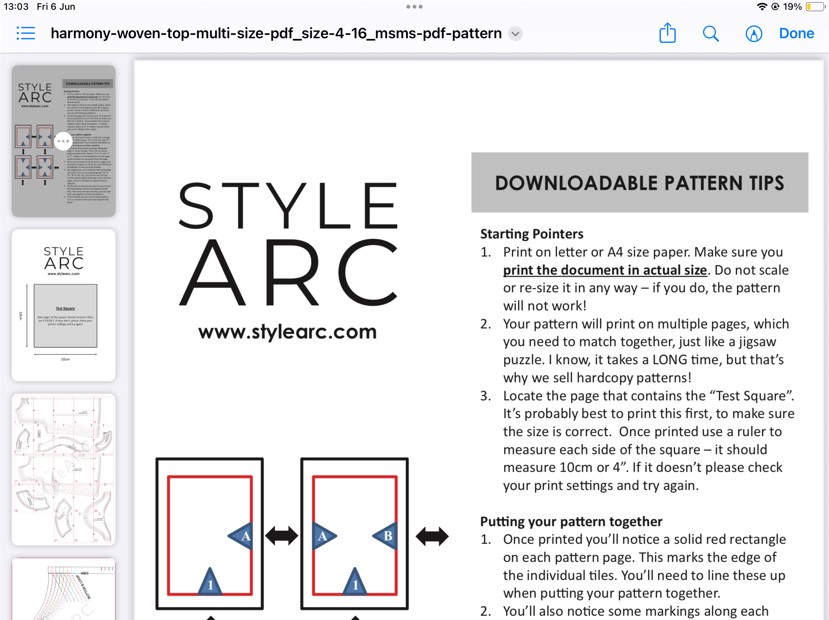
Print the downloaded PDF and check the test square
Tap the Share / Send To icon again. This time choose Print.
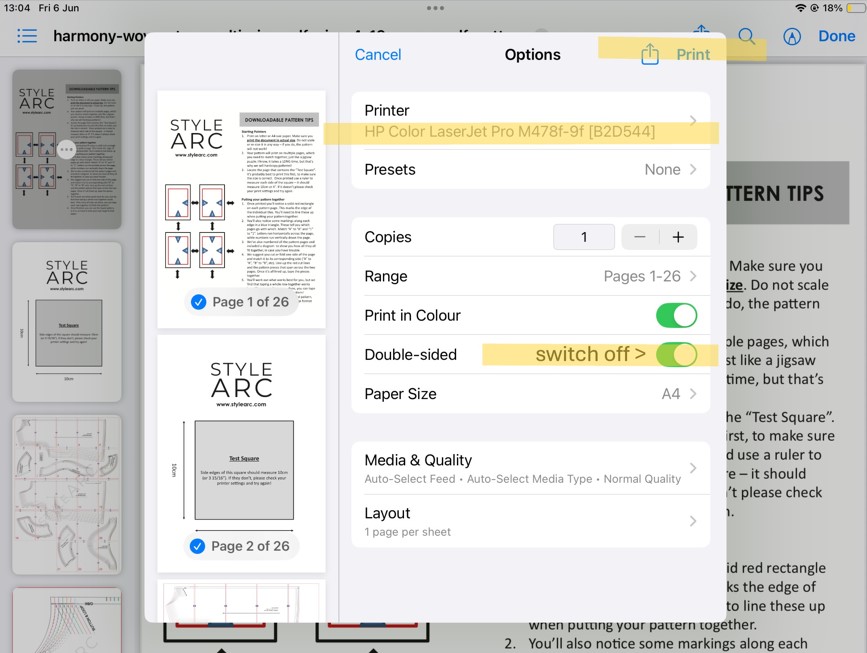
The print dialogue will open. Confirm that your printer is connected and check the page settings. Style Arc recommends single-sided printing and colour printing when using a nested multi-size pattern.
Print the test page first and measure the test square. It should measure 10 cm × 10 cm. Once it is correct, you can continue printing and assembling the pattern.
+The pages do not join correctly
Other ways to use your PDF pattern
Prefer to skip printing and taping at home?
Print A0 / Wide Format at a copy shop
Use the large-format file supplied with your order and have it printed at full scale.
Use a projector file
Newer Style Arc PDF releases can include a projector file for paper-free cutting.
Choose PDF size layers
Use Adobe’s Layers panel to simplify a layered multi-size pattern before printing.
Still need help?
Send us the information that will help us solve the problem quickly
If the steps above do not solve the problem, include as much of the following as possible when you contact Style Arc:
- Pattern name
- Device and operating system
- Printer make and model
- Screenshot or photo of the complete print dialogue
- Photo and measurement of the printed test square