Milan Woven Pant is an Arc Archives style. Limited formats. Construction sheets are minimal, and a tutorial might not exist - for confident sewists who are up for a challenge.
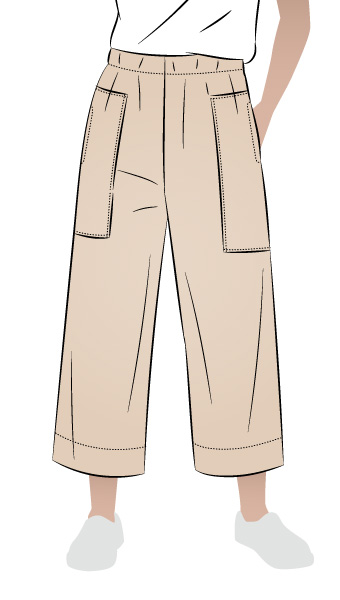
The Milan Woven Pant sewing pattern is a wide-leg, ankle-length pant with a deep hem, side pockets, and an elastic waist with adrawstring tie. Inverted pleats and back darts add shape for a comfortable yet stylish fit.
Wide leg ankle length pant with wide hem
Side pockets
Elastic waist with drawstring tie
Inverted pleats
Back darts
Fabric Suggestion
Linen, cotton
Trims
Elastic 4 cm (1 1/2 inch) refer to Measurement Chart for length.
Reviews (6)
6 reviews for Milan Woven Pant
4 out of 5
Format Reviewed: Printed Pattern - Multi-Size
A****a(verified owner) – :
I like these pants very much but I did need to make some adjustments. First note that the instructions are not very clear. Where Step No.7 should read “With right sides together sew front to back at side seams and topstitch if desired” it skips that step though the A.B C diagrams say this is how it should be done. Instead the side seams don’t get sewn until step 9, well after the inner leg seams and the crotch seam. Frankly Stylearc – that’s bad editing! The pockets are too tight to get your hands into if you use the very narrow pocket edge seam as shown on the stitching line. Use at least a 1.5cm on this top edge of the pocket bag and reinforce this seam with a 3cm wide strip of iron-on interfacing as the pocket edge front needs stabilisation. I took the crotch seam in, starting about 8cm from the crotch seam on the back to about 10cm from the top of the centre front, max is about 2cm at the inner leg seam and tapering to nothing at either end. I unpicked the tie casing and dumped the tie altogether as it’s bulky on this pattern in linen. I reinforced the front waistband with iron facing and only elastizied the back of the pants waist. Now they fit perfectly.
4 out of 5
Format Reviewed: PDF Digital Pattern - Multi-Size
C****e(verified owner) – :
Lovely pants, just the style I was looking for. Made first pair in a viscose/linen twill, which was an ideal match for the pattern. I like how the waistband comes together — very simple yet with a nice, detailed look. Easing in the waistband took some finessing, as did the deep hem. Recommend pressing your hemlines after leg pieces are cut, to make final turning up and sewing a bit easier. Will definitely be making more pairs!
5 out of 5
Format Reviewed: Printed Pattern - Multi-Size
j***n(verified owner) – :
Made these in a mid-weight pure Linen in a size 14 I did not make any adjustments to the pattern, it is true to size. I am 5’2″ and I love the length they can be worn with or without heels.
Another successful pattern, thank you.
5 out of 5
Format Reviewed: Printed Pattern - Single-Size
D***********h(verified owner) – :
I made these in linen, a straight size 10. The fit is perfect out of the packet with a deeper hem for my 160cm height. I made the channel and tie for the waistband, I stay stitched the channel 1cm from the edge before pressing the seam allowance under which made it easier to press evenly. This pants are very comfortable and they look great. They are a very worthy rival for the ‘Clarepants’
5 out of 5
Format Reviewed: Printed Pattern - Single-Size
s********1(verified owner) – :
Great pattern I have made it in linen and viscose. I didn’t make it with the tunnel for either. The viscose one I made with just gathers at the waist. Perfect length for me.
5 out of 5
Format Reviewed: Printed Pattern - Single-Size
j**y(verified owner) – :
This is really an easy pattern & the step-by-step instructions make it so. Right after I bought the pattern, I found a very similar version in a fashion magazine made in white linen. Linen would be a lovely fabric to work with on this pattern. However, I live in a very hot climate so I chose rayon which worked beautifully, but I should have always followed my own advice and basted more. The pattern is easy to follow and the outcome is magnificent: I would challenge anyone to think it ‘home made’–it is bespoke. I decided that I really didn’t need to baste when I joined the waist to the pants; bad decision on my part & it was operator error because ,of course, the challis shifted & I had to open the seam in a couple of places. And I hate using a seam ripper, especially on delicate fabric. A minute spent in basting always pays off & I know it. Basting held the pocket upper edge in place as well as the upper edge basted pleat until I was ready to attach the waistband. The suggestion to stitch on the seam making the pleat is excellent. I usually do a bar stitch to hold a pleat open, but because this is such a wide pleat, a bar at the bottom would be unsightly. Be sure to thread the tunnel before the waistband is attached to the pants because sewing the bit at the back so the string will not slid through needs to be done before the elastic is in & is just easier. Excellent and easy pattern.
Only logged in customers who have purchased this product may leave a review.
Garment Measurements & Fabric Estimate
Finished Pattern Measurements (cm)
sizes
4
6
8
10
12
14
16
18
20
22
24
26
28
30
Waist without elastic
78.6
83.6
88.6
93.6
98.6
103.6
108.6
113.6
119.6
125.6
131.6
137.6
143.6
149.6
Hip (Flat)
107.0
112.0
117.0
122.0
127.0
132.0
137.0
142.0
148.0
154.0
160.0
166.0
172.0
178.0
Leg Opening
63.4
64.6
65.8
67.0
68.2
69.4
70.6
71.8
73.0
74.2
75.4
76.6
77.8
79.0
Total Crotch Under Waistband
59.8
61.2
62.6
64.0
65.4
66.8
68.2
69.6
71.0
72.4
73.8
75.2
76.6
78.0
Knee Circumference
58.6
60.4
62.2
64.0
65.8
67.6
69.4
71.2
73.0
74.8
76.6
78.4
80.2
82.0
Elastic Measurement including 2cm SA
57.0
62.0
67.0
72.0
77.0
82.0
87.0
92.0
97.0
102.0
107.0
112.0
117.0
122.0
Finished Pattern Measurements (inches)
sizes
4
6
8
10
12
14
16
18
20
22
24
26
28
30
Waist without elastic
31
32 7⁄8
34 7⁄8
36 7⁄8
38 7⁄8
40 3⁄4
42 3⁄4
44 3⁄4
47 1⁄8
49 1⁄2
51 3⁄4
54 1⁄8
56 1⁄2
58 7⁄8
Hip (Flat)
42 1⁄8
44 1⁄8
46 1⁄8
48
50
52
53 7⁄8
55 7⁄8
58 1⁄4
60 5⁄8
63
65 3⁄8
67 3⁄4
70 1⁄8
Leg Opening
25
25 3⁄8
25 7⁄8
26 3⁄8
26 7⁄8
27 3⁄8
27 3⁄4
28 1⁄4
28 3⁄4
29 1⁄4
29 5⁄8
30 1⁄8
30 5⁄8
31 1⁄8
Total Crotch Under Waistband
23 1⁄2
24 1⁄8
24 5⁄8
25 1⁄4
25 3⁄4
26 1⁄4
26 7⁄8
27 3⁄8
28
28 1⁄2
29
29 5⁄8
30 1⁄8
30 3⁄4
Knee Circumference
23 1⁄8
23 3⁄4
24 1⁄2
25 1⁄4
25 7⁄8
26 5⁄8
27 3⁄8
28
28 3⁄4
29 1⁄2
30 1⁄8
30 7⁄8
31 5⁄8
32 1⁄4
Elastic Measurement including 2cm SA
22 1⁄2
24 3⁄8
26 3⁄8
28 3⁄8
30 3⁄8
32 1⁄4
34 1⁄4
36 1⁄4
38 1⁄4
40 1⁄8
42 1⁄8
44 1⁄8
46 1⁄8
48
As every body is unique, we recommend sewing a toile to check the fit before cutting into your final garment fabric, especially when using a special fabric.
Fabric Estimate
sizes
4-10
12-22
24-30
Width 148 cm (58")
2.00 m (2.20 yd)
2.25 m (2.50 yd)
2.50 m (2.75 yd)
Size Chart
Womens Size Charts
Please use the body measurements size charts below to determine your best size.
All Style Arc patterns are in Australian sizes.
Style Arc patterns are drafted for a B bust cup size and a height of 167cm (5'6").
Size Chart - CM
Size
A. Shoulder Breadth (cm)
B. Upper Arm Girth (cm)
C. Bust (cm)
D. Waist (cm)
E. Hip (cm)
4
34.4
26.4
77
60
83
6
35.6
27.6
82
65
88
8
36.8
28.8
87
70
93
10
38
30
92
75
98
12
39.2
31.2
97
80
103
14
40.4
32.4
102
85
108
16
41.6
33.6
107
90
113
18
42.8
34.8
112
95
118
20
44
36
118
100
124
22
45.2
37.2
124
106
130
24
46.4
38.4
130
112
136
26
47.6
39.6
136
118
142
28
48.8
40.8
142
124
148
30
50
42
148
130
154
32
51.2
43.8
156.0
139.0
162.0
34
52.4
45.6
164.0
147.0
170.0
36
53.6
47.4
172.0
155.0
178.0
Size Chart - Inches
Size
A. Shoulder Breadth (inches)
B. Upper Arm Girth (inches)
C. Bust (inches)
D. Waist (inches)
E. Hip (inches)
4
13.5
10.5
30.3
23.5
32.6
6
14
10.9
32.3
25.5
34.6
8
14.5
11.3
34.3
27.5
36.6
10
15
11.8
36.2
29.5
38.6
12
15.4
12.3
38.2
31.5
40.6
14
15.9
12.8
40.2
33.5
42.5
16
16.4
13.2
42.1
35.5
44.5
18
16.9
13.7
44.1
37.5
46.5
20
17.3
14.2
46.5
39.5
48.8
22
17.8
14.6
48.8
42
51.2
24
18.3
15.1
51.2
44.5
53.5
26
18 3⁄4
15 5⁄8
53 1⁄2
46.5
56
28
19 1⁄4
16 1⁄8
56
48.5
58 1⁄4
30
19 3⁄4
16 5⁄8
58 1⁄4
50.5
61
32
20 1⁄8
17 1⁄4
61 3⁄8
54 3⁄4
63 3⁄4
34
20 5⁄8
18
64 5⁄8
57 7⁄8
66 7⁄8
36
21 1⁄8
18 5⁄8
67 3⁄4
61
70 1⁄8
Size Conversion Table
ALPHA SIZING
AUSTRALIA
UK
US
FRANCE
ITALY
JAPAN
XXS
6
6
2
34
38
5
XS
8
8
4
36
40
7
S
10
10
6
38
42
9
M
12
12
8
40
44
11
L
14
14
10
42
46
13
XL
16
16
12
44
48
15
XXL
18
18
14
46
50
17
3XL
20
20
16
48
52
19
4XL
22
22
18
50
54
21
5XL
24
24
20
52
56
23
How Do I Know What Size I Am?
Choosing your pattern size is the most important step and we will help you determine this with these easy to follow steps.
When taking your measurements ensure that you take them against your skin and not over clothing. One can wear a comfortable bra and knickers whilst measuring, as this will provide you with the most accurate measurements.
Tape measure has to sit firmly around the points you are measuring. But be careful not to pull it too tight, as this will give you the incorrect size.
When measuring circumferences (B, C, D, E) it is important to note that the tape measure must remain parallel to the floor. It is sometimes best to take the measurements in front of a mirror; this will help you see the angle of the tape measure.
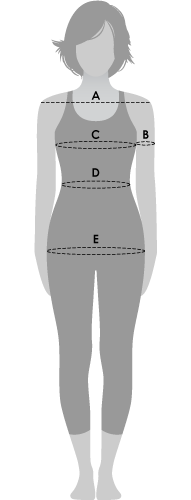
You will only require the basic body measurements to determine your pattern size which is indicated on our mannequin below:
A. Shoulder Breadth
Place the tape at the edge of the shoulder. Measure along the top of the shoulder blade/across the highest point of the shoulders to the other edge, following the natural slope and allow an extra finger for ease of any movement.
B. Upper Arm Girth
This point is taken as a circumference at your widest point of your upper arm.
C. Bust
This point is taken as a circumference parallel to the floor at the fullest part of your chest.
D. Waist
This point is taken as a circumference and taken at the smallest part of your waist.
E. Hip
This point is taken as a circumference parallel to the floor at the widest part of your hips.
Pattern Format Details
Pattern Format
Printed Pattern - Single-Size
Single-size hard copy sewing pattern, mailed to your delivery address.
Multi-size PDF sewing pattern download, sent to your email address in multi-sheet/tiled format for printing at home on A4 or US letter size paper and single-sheet/wide format for printing at a copy shop. Please note that the wide format files are set up for printing on 36" wide (or wider) paper rolls, and also A0 paper sheets.
Single-size PDF sewing pattern download, sent to your email address in multi-sheet/tiled format for printing at home on A4 or US letter size paper AND single-sheet/wide format for printing at a copy shop. You get the size you order, PLUS the two closest sizes. Please note that the wide format files are set up for printing on 36" wide (or wider) paper rolls, not A0 paper sheets.
For more information on digital patterns click here.


Format Reviewed: Printed Pattern - Multi-Size
A****a (verified owner) – :
I like these pants very much but I did need to make some adjustments. First note that the instructions are not very clear. Where Step No.7 should read “With right sides together sew front to back at side seams and topstitch if desired” it skips that step though the A.B C diagrams say this is how it should be done. Instead the side seams don’t get sewn until step 9, well after the inner leg seams and the crotch seam. Frankly Stylearc – that’s bad editing! The pockets are too tight to get your hands into if you use the very narrow pocket edge seam as shown on the stitching line. Use at least a 1.5cm on this top edge of the pocket bag and reinforce this seam with a 3cm wide strip of iron-on interfacing as the pocket edge front needs stabilisation. I took the crotch seam in, starting about 8cm from the crotch seam on the back to about 10cm from the top of the centre front, max is about 2cm at the inner leg seam and tapering to nothing at either end. I unpicked the tie casing and dumped the tie altogether as it’s bulky on this pattern in linen. I reinforced the front waistband with iron facing and only elastizied the back of the pants waist. Now they fit perfectly.
Format Reviewed: PDF Digital Pattern - Multi-Size
C****e (verified owner) – :
Lovely pants, just the style I was looking for. Made first pair in a viscose/linen twill, which was an ideal match for the pattern. I like how the waistband comes together — very simple yet with a nice, detailed look. Easing in the waistband took some finessing, as did the deep hem. Recommend pressing your hemlines after leg pieces are cut, to make final turning up and sewing a bit easier. Will definitely be making more pairs!
Format Reviewed: Printed Pattern - Multi-Size
j***n (verified owner) – :
Made these in a mid-weight pure Linen in a size 14 I did not make any adjustments to the pattern, it is true to size. I am 5’2″ and I love the length they can be worn with or without heels.
Another successful pattern, thank you.
Format Reviewed: Printed Pattern - Single-Size
D***********h (verified owner) – :
I made these in linen, a straight size 10. The fit is perfect out of the packet with a deeper hem for my 160cm height. I made the channel and tie for the waistband, I stay stitched the channel 1cm from the edge before pressing the seam allowance under which made it easier to press evenly. This pants are very comfortable and they look great. They are a very worthy rival for the ‘Clarepants’
Format Reviewed: Printed Pattern - Single-Size
s********1 (verified owner) – :
Great pattern I have made it in linen and viscose. I didn’t make it with the tunnel for either. The viscose one I made with just gathers at the waist. Perfect length for me.
Format Reviewed: Printed Pattern - Single-Size
j**y (verified owner) – :
This is really an easy pattern & the step-by-step instructions make it so. Right after I bought the pattern, I found a very similar version in a fashion magazine made in white linen. Linen would be a lovely fabric to work with on this pattern. However, I live in a very hot climate so I chose rayon which worked beautifully, but I should have always followed my own advice and basted more. The pattern is easy to follow and the outcome is magnificent: I would challenge anyone to think it ‘home made’–it is bespoke. I decided that I really didn’t need to baste when I joined the waist to the pants; bad decision on my part & it was operator error because ,of course, the challis shifted & I had to open the seam in a couple of places. And I hate using a seam ripper, especially on delicate fabric. A minute spent in basting always pays off & I know it. Basting held the pocket upper edge in place as well as the upper edge basted pleat until I was ready to attach the waistband. The suggestion to stitch on the seam making the pleat is excellent. I usually do a bar stitch to hold a pleat open, but because this is such a wide pleat, a bar at the bottom would be unsightly. Be sure to thread the tunnel before the waistband is attached to the pants because sewing the bit at the back so the string will not slid through needs to be done before the elastic is in & is just easier. Excellent and easy pattern.