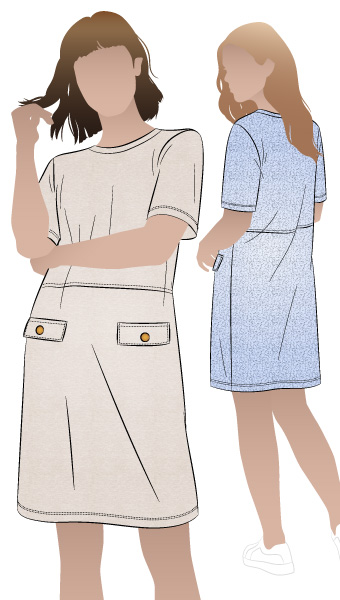
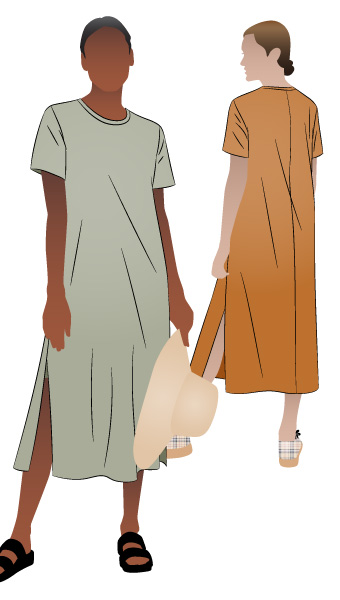
- Scoop neckline with band
- Arm bands
- Sleeveless
- Slight body shape
- Pull on easy fit
- Ankle length or knee length
Cotton jersey, spandex knit, bamboo knit or other knit fabrics suitable for a dress.


AUD $19.00
| USD $13.10 | |
| GBP £9.87 | |
| EUR €11.51 | |
| CAD $18.63 | |
| NZD $23.10 | |
| JPY ¥2,129.30 | |
| *Currency conversions are displayed for informational purposes only. All transactions are completed in Australian Dollars (AUD). |
|
|---|---|
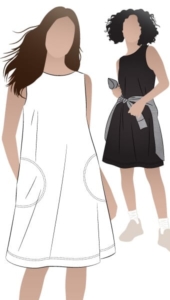
Slightly A-line sleeveless, ankle or knee length knit dress.
Cotton jersey, spandex knit, bamboo knit or other knit fabrics suitable for a dress.
Only logged in customers who have purchased this product may leave a review.
| sizes | 4 | 6 | 8 | 10 | 12 | 14 | 16 | 18 | 20 | 22 | 24 | 26 | 28 | 30 |
|---|---|---|---|---|---|---|---|---|---|---|---|---|---|---|
| Bust | 73.0 | 78.0 | 83.0 | 88.0 | 93.0 | 98.0 | 103.0 | 108.0 | 114.0 | 120.0 | 126.0 | 132.0 | 138.0 | 144.0 |
| Hip (20cm below waist band) | 93.0 | 98.0 | 103.0 | 108.0 | 113.0 | 118.0 | 123.0 | 128.0 | 134.0 | 140.0 | 146.0 | 152.0 | 158.0 | 164.0 |
| Shoulder breadth including band | 30.4 | 30.4 | 30.4 | 30.4 | 30.4 | 30.4 | 30.4 | 30.4 | 31.0 | 31.6 | 32.2 | 32.8 | 33.4 | 34.0 |
| Center back length total | 118.2 | 118.8 | 119.4 | 120.0 | 120.6 | 121.2 | 121.8 | 122.4 | 123.0 | 123.6 | 124.2 | 124.8 | 125.4 | 126.0 |
| Hem circumference | 105.0 | 110.0 | 115.0 | 120.0 | 125.0 | 130.0 | 135.0 | 140.0 | 146.0 | 152.0 | 158.0 | 164.0 | 170.0 | 176.0 |
| sizes | 4 | 6 | 8 | 10 | 12 | 14 | 16 | 18 | 20 | 22 | 24 | 26 | 28 | 30 |
|---|---|---|---|---|---|---|---|---|---|---|---|---|---|---|
| Bust | 28 3⁄4 | 30 3⁄4 | 32 5⁄8 | 34 5⁄8 | 36 5⁄8 | 38 5⁄8 | 40 1⁄2 | 42 1⁄2 | 44 7⁄8 | 47 1⁄4 | 49 5⁄8 | 52 | 54 3⁄8 | 56 3⁄4 |
| Hip (20cm below waist band) | 36 5⁄8 | 38 5⁄8 | 40 1⁄2 | 42 1⁄2 | 44 1⁄2 | 46 1⁄2 | 48 3⁄8 | 50 3⁄8 | 52 3⁄4 | 55 1⁄8 | 57 1⁄2 | 59 7⁄8 | 62 1⁄4 | 64 5⁄8 |
| Shoulder breadth including band | 12 | 12 | 12 | 12 | 12 | 12 | 12 | 12 | 12 1⁄4 | 12 1⁄2 | 12 5⁄8 | 12 7⁄8 | 13 1⁄8 | 13 3⁄8 |
| Center back length total | 46 1⁄2 | 46 3⁄4 | 47 | 47 1⁄4 | 47 1⁄2 | 47 3⁄4 | 48 | 48 1⁄4 | 48 3⁄8 | 48 5⁄8 | 48 7⁄8 | 49 1⁄8 | 49 3⁄8 | 49 5⁄8 |
| Hem circumference | 41 3⁄8 | 43 1⁄4 | 45 1⁄4 | 47 1⁄4 | 49 1⁄4 | 51 1⁄8 | 53 1⁄8 | 55 1⁄8 | 57 1⁄2 | 59 7⁄8 | 62 1⁄4 | 64 5⁄8 | 66 7⁄8 | 69 1⁄4 |
As every body is unique, we recommend sewing a toile to check the fit before cutting into your final garment fabric, especially when using a special fabric.
| sizes | 4-12 | 14-18 | 20-30 |
|---|---|---|---|
| Width 148 cm (58") | 1.60 m (1.75 yd) | 2.20 m (2.40 yd) | 3.00 m (3.30 yd) |
Please use the body measurements size charts below to determine your best size.
All Style Arc patterns are in Australian sizes.
Style Arc patterns are drafted for a B bust cup size and a height of 167cm (5'6").
| Size | A. Shoulder Breadth (cm) | B. Upper Arm Girth (cm) | C. Bust (cm) | D. Waist (cm) | E. Hip (cm) |
|---|---|---|---|---|---|
| 4 | 34.4 | 26.4 | 77 | 60 | 83 |
| 6 | 35.6 | 27.6 | 82 | 65 | 88 |
| 8 | 36.8 | 28.8 | 87 | 70 | 93 |
| 10 | 38 | 30 | 92 | 75 | 98 |
| 12 | 39.2 | 31.2 | 97 | 80 | 103 |
| 14 | 40.4 | 32.4 | 102 | 85 | 108 |
| 16 | 41.6 | 33.6 | 107 | 90 | 113 |
| 18 | 42.8 | 34.8 | 112 | 95 | 118 |
| 20 | 44 | 36 | 118 | 100 | 124 |
| 22 | 45.2 | 37.2 | 124 | 106 | 130 |
| 24 | 46.4 | 38.4 | 130 | 112 | 136 |
| 26 | 47.6 | 39.6 | 136 | 118 | 142 |
| 28 | 48.8 | 40.8 | 142 | 124 | 148 |
| 30 | 50 | 42 | 148 | 130 | 154 |
| 32 | 51.2 | 43.8 | 156.0 | 139.0 | 162.0 |
| 34 | 52.4 | 45.6 | 164.0 | 147.0 | 170.0 |
| 36 | 53.6 | 47.4 | 172.0 | 155.0 | 178.0 |
| Size | A. Shoulder Breadth (inches) | B. Upper Arm Girth (inches) | C. Bust (inches) | D. Waist (inches) | E. Hip (inches) |
|---|---|---|---|---|---|
| 4 | 13.5 | 10.5 | 30.3 | 23.5 | 32.6 |
| 6 | 14 | 10.9 | 32.3 | 25.5 | 34.6 |
| 8 | 14.5 | 11.3 | 34.3 | 27.5 | 36.6 |
| 10 | 15 | 11.8 | 36.2 | 29.5 | 38.6 |
| 12 | 15.4 | 12.3 | 38.2 | 31.5 | 40.6 |
| 14 | 15.9 | 12.8 | 40.2 | 33.5 | 42.5 |
| 16 | 16.4 | 13.2 | 42.1 | 35.5 | 44.5 |
| 18 | 16.9 | 13.7 | 44.1 | 37.5 | 46.5 |
| 20 | 17.3 | 14.2 | 46.5 | 39.5 | 48.8 |
| 22 | 17.8 | 14.6 | 48.8 | 42 | 51.2 |
| 24 | 18.3 | 15.1 | 51.2 | 44.5 | 53.5 |
| 26 | 18 3⁄4 | 15 5⁄8 | 53 1⁄2 | 46.5 | 56 |
| 28 | 19 1⁄4 | 16 1⁄8 | 56 | 48.5 | 58 1⁄4 |
| 30 | 19 3⁄4 | 16 5⁄8 | 58 1⁄4 | 50.5 | 61 |
| 32 | 20 1⁄8 | 17 1⁄4 | 61 3⁄8 | 54 3⁄4 | 63 3⁄4 |
| 34 | 20 5⁄8 | 18 | 64 5⁄8 | 57 7⁄8 | 66 7⁄8 |
| 36 | 21 1⁄8 | 18 5⁄8 | 67 3⁄4 | 61 | 70 1⁄8 |
| ALPHA SIZING | AUSTRALIA | UK | US | FRANCE | ITALY | JAPAN |
|---|---|---|---|---|---|---|
| XXS | 6 | 6 | 2 | 34 | 38 | 5 |
| XS | 8 | 8 | 4 | 36 | 40 | 7 |
| S | 10 | 10 | 6 | 38 | 42 | 9 |
| M | 12 | 12 | 8 | 40 | 44 | 11 |
| L | 14 | 14 | 10 | 42 | 46 | 13 |
| XL | 16 | 16 | 12 | 44 | 48 | 15 |
| XXL | 18 | 18 | 14 | 46 | 50 | 17 |
| 3XL | 20 | 20 | 16 | 48 | 52 | 19 |
| 4XL | 22 | 22 | 18 | 50 | 54 | 21 |
| 5XL | 24 | 24 | 20 | 52 | 56 | 23 |
Choosing your pattern size is the most important step and we will help you determine this with these easy to follow steps.
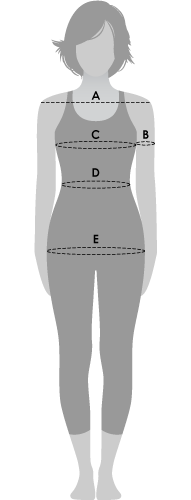
Place the tape at the edge of the shoulder. Measure along the top of the shoulder blade/across the highest point of the shoulders to the other edge, following the natural slope and allow an extra finger for ease of any movement.
This point is taken as a circumference at your widest point of your upper arm.
This point is taken as a circumference parallel to the floor at the fullest part of your chest.
This point is taken as a circumference and taken at the smallest part of your waist.
This point is taken as a circumference parallel to the floor at the widest part of your hips.
| Printed Pattern - Single-Size | |
|---|---|
| Single-size hard copy sewing pattern, mailed to your delivery address. |
| PDF Digital Pattern - Multi-size (Layered Including A0) | |
|---|---|
| Multi-size PDF sewing pattern download, sent to your email address in multi-sheet/tiled format for printing at home on A4 or US letter size paper and single-sheet/wide format for printing at a copy shop. Please note that the wide format files are set up for printing on 36" wide (or wider) paper rolls, and also A0 paper sheets. | |
| PDF Digital Pattern - Single-Size (Including A0) | |
| Single-size PDF sewing pattern download, sent to your email address in multi-sheet/tiled format for printing at home on A4 or US letter size paper AND A0 format for printing at a copy shop. You get the size you order, PLUS the two closest sizes. | |
| Printed Pattern - Multi-Size | |
| Multi-size hard copy sewing pattern, mailed to your delivery address. |
For more information on digital patterns click here.
Format Reviewed: PDF Digital Pattern - Multi-Size
s********s (verified owner) – :
A really quick and well fitting make. The pattern makes up really quickly and I found the fit around the shoulders and bust line to be spot on.
Format Reviewed: PDF Digital Pattern - Multi-Size
k****d (verified owner) – :
Quick easy make and comfortable to wear. Went up a size to my usual and glad I did.
Format Reviewed: PDF Digital Pattern - Multi-Size
s************f (verified owner) – :
I thought it would be a quick make but…. The bands on the neck gaped so I undid and resewed. They still gaped a bit and no, I didn’t stretch the body fabric, just the band. I think the band pieces were a bit long. My armholes gaped, so I put in a high dart on each side. It fixed the problem and I don’t think it’s noticeable as I used a very busy marble design on my cotton lycra. Once finished it’s comfortable to wear. Again the instructions are really poor compared to other independent pattern companies. The instructions said all seams a were 1cm but the markings on the band pattern pieces were clearly for 6mm seams. I have tried Style Arc several times and while the designs look great, the patterns fall down in their lack of instruction. I won’t be using Style Arc again. Sorry, but someone has to point out your major failing.